I have seen multiple blogs and articles from people who explain what are the different controls available in a camera and what these controls mean. What’s interesting to know is, how these controls function under the hood.
- What is Camera’s ISO?
- Amplification Factor and Signal Gain
- How Camera Manufacturers Control ISO
- Side Effects of ISO Control
What is Camera’s ISO?
In general, ISO stands for International Organization for Standardization but in terms of Cameras it is the measure of how sensitive the camera is towards light. From our previous blog, we saw that the photodiodes in the image sensor convert light energy into electrical signals. These signals are still Analog (not system understandable) and the voltage of these signals are quite low. To boost the electrical signals there is an Analog Amplifier placed just before the Analog to Digital Converter(ADC). There is an additional Digital Signal Amplifier placed just after the ADC which further boosts the signal.
To technically answer what a Camera’s ISO is… It is the control over the Analog and Digital Amplifier placed before and after the ADC to change the sensitivity of the light signal received. Let’s look at the diagram below to understand how the signals are amplified.

Amplification Factor and Signal Gain
This part of the blog is purely technical and is a gist to someone who wants to get an overview of how the sensitivity of the camera is increased. If you are already aware of these terms or want to skip the theory and get back to how camera ISOs work, you can skip this part.
The extent to how much an amplifier boosts the input electrical signals is known as Amplification Factor. To technically answer this question, the ratio of the output amplitude to the input amplitude of the input signal is known as the Amplification Factor (A).
A = Output Amplitude / Input Amplitude
Any system which has an Amplification factor greater than 1 is an Amplifier, because it boosts the signal. Conversely, any system that has an Amplification factor lesser than 1 is an Attenuator, because it suppresses the signal.
Depending on the Image Sensor Manufacturers, the camera’s ISO control could either be handled as Amplification Factor, which is a dimensionless unit of measure or handled as Signal Gain, which is measured in dB (decibels).
The formula to convert Amplification Factor to decibels is quite straight forward.
Gain (dB) = 20 log10 (Amplification Factor)
Let’s say, an input electrical signal of 35mV is generated from the photodiode of the image sensor. This signal is passed on to the Amplifier whose current Gain value is 32dB. The output electrical signal can be calculated using the above mentioned formula.
Step 1: Calculate Amplification Factor from Gain
Reverse formula – A = 10(Gain in dB / 20)
A = 10(32/20)
A = 101.6
A ~= 39.81x
Step 2: Calculate output Signal using Amplification Factor
Output Signal = Amplification Factor x Input Signal
Op Signal = 39.81 x 35mV
Op Signal = 1393.35mV (or) 1.39V
How Camera Manufacturers Control ISO
In the previous topic, we briefly covered what Amplification Factor is, how it is related to Gain. We also covered how these correspond to the sensitivity of the signal received from the Image Sensor. We will now understand how the control is handled from the User right down to the Hardware.
According to the global standard, ISO is a stop by stop control of how sensitive your camera needs to be. It is an exponential scale starting from ISO 100, 200, 400, 800, 1600, 3200, etc. A lower ISO number (e.g., ISO 100 or 200) corresponds to lower sensitivity and is typically used in bright conditions. Higher ISO numbers (e.g., ISO 800, 1600, or higher) indicate higher sensitivity and are used in low-light conditions. Every Image sensor for a camera has different sensitivity range based on the Amplifiers used. Thus, to maintain a common standard, every camera will have a Look Up Table between the ISO values and the Amplification Factor internally to ensure the sensitivity change is linear.
When a user changes the ISO setting on the camera, the corresponding Amplification Factor value is passed down to the Camera System. If the Image Sensor accepts input in Gain(dB) then the conversion happens inside the Camera Sub System before it is submitted to the Image Sensor.
Let’s look at an example using Sony’s Low Light Image Sensor (IMX290). The below graph is an linear relation between the Analog & Digital Gain provided by the Sensor.
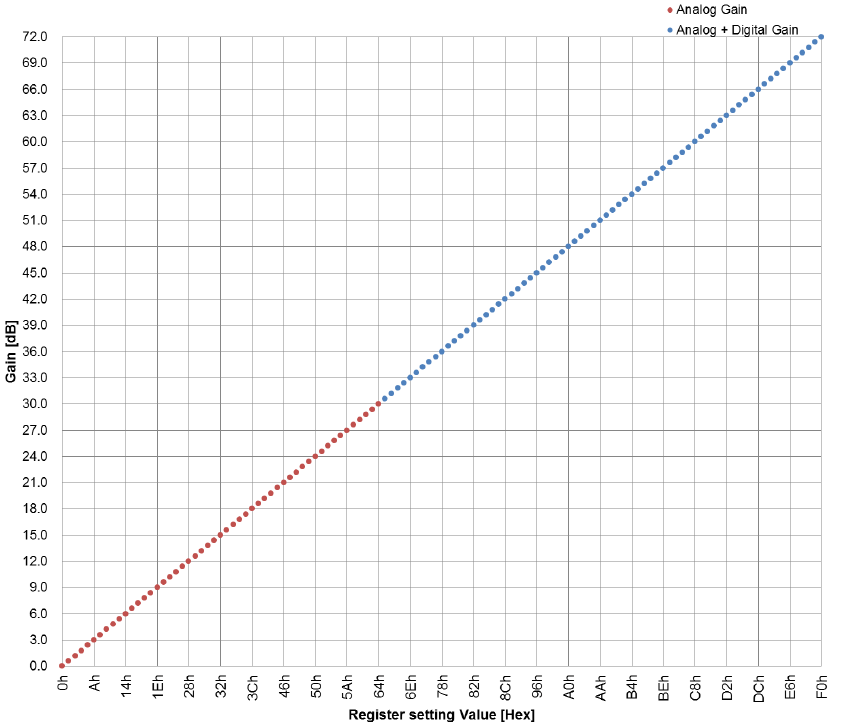
The Image Sensor Contains a Register, which can be written to change the Sensitivity. In this particular example, the value that needs to be written to the register needs to be 10/3 times the Gain in dB.
To give a complete flow of control in this example, let’s assume the user has changed the sensitivity from ISO100 to ISO800.
Step 1: Amplification Factor from the corresponding Look Up Table for ISO800 is passed down to the Camera Sub System. Let’s assume, 28.3x is the value.
Step 2: Since, the Image Sensor accepts values only in Gain, the Amplification Factor is converted into Gain in (dB). Using the formula, Gain = 20log10(A), we get Gain to be around 29.03dB
Step 3: We need to convert the Gain to Register Value that can be updated in the Sensor’s control Register.
Register Value = 29.03 * 10 / 3 ~= 97 (0x61 in Hexadecimal).
If you cross check this value in the above graph, it would correspond to 29dB Analog Gain.
Side Effects of ISO Control
Since we artificially boost the light signals using the Amplifiers to perceive more info, there is a very high chance of observing noise (mainly due to Digital Gain). That’s the reason why we see a lot of grains when we increase the ISO Sensitivity while capturing Images in Low Light.

Now that’s a Wrap! In the next blog, we will deep dive technically into the Camera’s Exposure Control.
Drop a like or your feedback if you found this useful. Sayonara 🙂

Leave a reply to Technical Dive Into Camera Controls – Exposure – Waiss Kharni SM Cancel reply